Headless Crawler
This guide walks you through the process of crawling a website using Headless crawler.
Why and when to use headless crawler
Best for: Modern JavaScript-heavy applications.
Uses a headless browser to render pages and execute JavaScript. Captures content generated dynamically by client-side code.
Use when:
- Target is a Single Page Application (SPA)
- Content loads via AJAX/Fetch
- JavaScript frameworks (React, Vue, Angular)
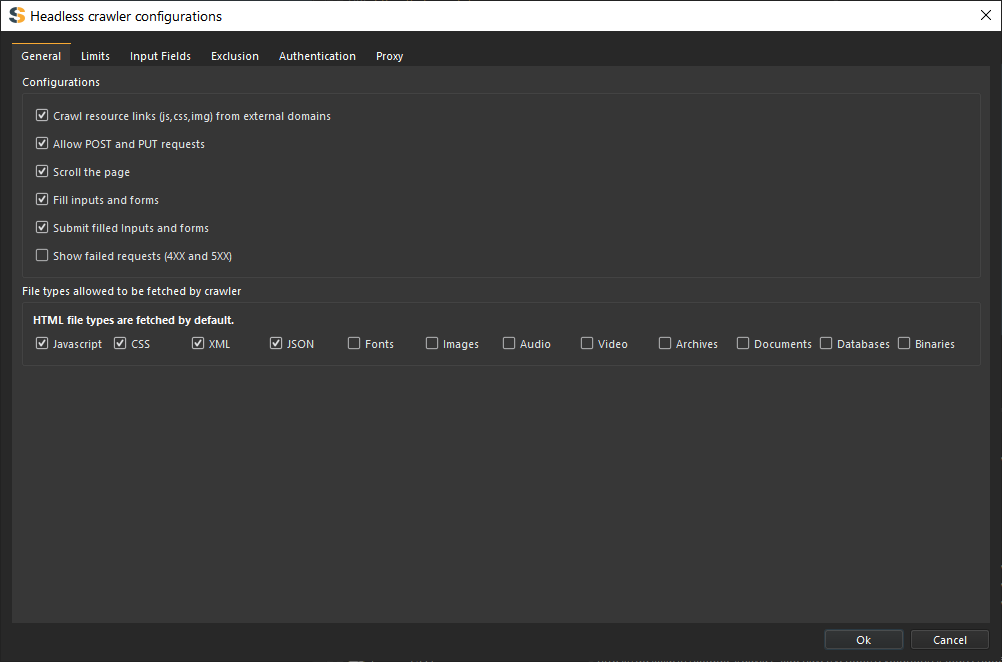
Configurations
Ignore query parameters
Configures the crawler to ignore crawling same paths with different query parameter values.
e.g. https://example.com?param1=1¶m2=2 == https://example.com
Allow POST and PUT requests
Configures the crawler to allow the browser to send POST and PUT requests which can potentially modify server-side items.
Crawl Resource Links from external domains:
Configures the spider to crawl resources (images, css, js, json, xml & fonts) hosted from a different host. Most webpages use resources hosted from different hosts. If this feature is selected external resources will are crawled if this feature not selected only resources from the target host will be crawled.
Follow robots.txt Exclusions:
Configures the crawler to follow the “/robots.txt” exclusions if available. The robots.txt exclusion is highly dependent on the user-agent used hence the crawler will follow the exclusions according to the user-agents you’ve chosen.
The robot’s exclusion standard, also known as the robot’s exclusion protocol or simply robots.txt, is a standard used by websites to communicate with web crawlers and other web robots.
Scroll the page
Configures the headless crawler to scroll to the bottom and back after the page is fully loaded.
For sites with infinite scrolling, the crawler only scrolls until the second content load then scrolls back to the top.
Fill html forms and inputs
Configures the headless crawler to fill all available html forms and inputs after the page is fully loaded.
This option only allows for filling of forms and inputs without submision.
Submit filled html forms and inputs
Configures the headless crawler to submit all filled html forms and inputs after the page is fully loaded.
Only if all the required fields of the form or input are filled will the form be submitted.
Show failed requests (4XX and 5XX)
Configures the crawler not to discard 4XX and 5XX error responses and instead, add them to database and send them to sitemap. Connection, SSL and other system errors will not be added to sitemap only error responses with 4XX and 5XX.
Crawling
Select Crawler Type
Choose the Headless Crawler option from the dropdown menu.
Enter Target URL
- Enter the target URL in the URL field
- Ensure the URL includes the protocol (
http://orhttps://) - Verify the URL is accessible
Examples:
https://example.comhttps://api.example.com/v1http://localhost:3000
Configure the crawler
Click the configuration icon to access and configure crawler settings.
Configure Scope
Define what URLs should be crawled:
- Include patterns
- Exclude patterns
Start Crawling
Click the [Start] button to begin the crawl. The crawler will immediately start processing the target.
Monitor Progress
Watch the progress indicator in the right corner:
Progress: <pages_crawled> / <total_pages>
Control Crawling
While crawling, you have several control options:
Pause Crawler
- Click
[Pause]to temporarily stop crawling - Already-sent requests will complete
- Pages in queue remain for resume
Resume Crawler
- Click
[Resume]to continue from where you paused - The crawler picks up immediately
Stop Crawler
- Click
[Stop]to terminate the crawl completely - Waits for in-flight requests to complete
- Cannot be resumed - must start fresh
Crawler Behavior
The sitemap updates in real-time as pages are discovered.
Understanding Crawler Actions
When you Pause:
- Stops sending new requests
- Processes responses already received
- You may see a few more pages added to sitemap
- Can resume at any time
When you Stop:
- Terminates crawler threads
- Waits for pending responses
- Cleans up resources
- Cannot resume - state is lost
After clicking Stop or Pause, you may see pages still being added to the sitemap. This is normal - the crawler is processing responses that were already in flight.
Completion
When the crawler finishes:
- An alert notification appears
- The progress shows 100%
- The sitemap contains all discovered pages
- You can begin analysis
Crawling Best Practices
Start Small
Begin with conservative settings:
- Low depth limit (2-3 levels)
- Moderate page limit (100-500 pages)
Increase limits as you understand the target better.
Respect Target Servers
- Honor robots.txt (if appropriate)
- Avoid overwhelming small servers
Monitor Resource Usage
For large sites, consider crawling in stages - start with a shallow crawl to understand the structure, then do targeted deep crawls on specific sections.