Request
This guide explains how to use the Request tool to manually craft, send, and analyze HTTP requests.
Why and when to use Request
Best for: Testing individual requests and analyzing server responses
The Request tool functions similarly to a repeater tool found in web security testing platform burp suite. It allows you to manually create HTTP requests, send them to a target server, and inspect the resulting responses.
The tool is useful for validating findings, testing parameters, modifying requests, reproducing vulnerabilities, and analyzing application behavior.
Use when:
- Testing individual endpoints
- Verifying vulnerabilities
- Analyzing server responses
- Testing authentication mechanisms
- Debugging APIs
- Experimenting with request parameters and headers
Request Interface
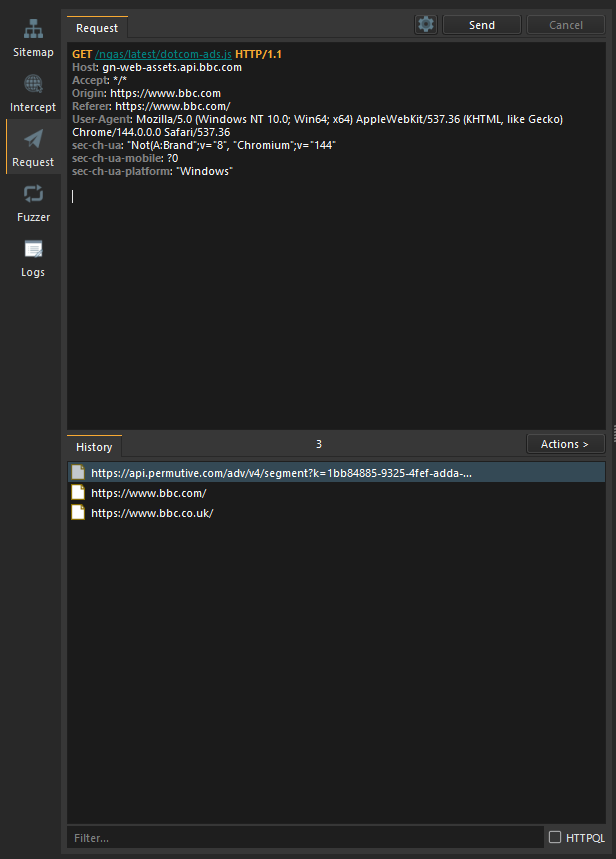
The Request tool consists of three primary components:
Request Editor
The Request Editor is a text editor where HTTP requests are created or modified.
Users can manually write requests or paste requests copied from other SpiderSuite modules.
Example:
GET /api/users HTTP/1.1
Host: example.com
User-Agent: SpiderSuite
Send Button
The Send button submits the request to the target server.
After sending:
- The request is processed
- The server response is received
- Results are displayed
- The transaction is added to the history view
Configuration Button
The Configuration button opens the Request Settings dialog.
These settings control how requests are sent and processed.
Request Settings
Follow Redirects
Automatically follows HTTP redirect responses.
Supported redirects include:
- 301 Moved Permanently
- 302 Found
- 303 See Other
- 307 Temporary Redirect
- 308 Permanent Redirect
When disabled, redirect responses are returned directly without following the new location.
Request Timeout
Controls how long SpiderSuite waits for a response before terminating the request.
Proxy Configuration
Configures a proxy server through which requests will be routed.
Supported proxy types include:
- HTTP Proxy
- HTTPS Proxy
- SOCKS4 Proxy
- SOCKS5 Proxy
Typical use cases:
- Routing traffic through interception tools
- Testing proxy configurations
- Anonymizing requests
- Network debugging
History View
Every request sent through the Request tool is automatically recorded in the History View.
The History View provides quick access to previous requests and responses.
Reusing Requests
Any entry in the History View can be reopened in the Request Editor.
This allows rapid testing of modified requests without recreating them from scratch.
Sending a Request
Open Request
Open the Request module from the SpiderSuite.
Create or Paste a Request
Enter a valid HTTP request into the Request Editor.
Configure Settings
Use the Configuration button to adjust:
- Redirect handling
- Timeout values
- Proxy settings
Send Request
Click the Send button.
Review Response
Inspect the returned status code, headers, body, and timing information.
Review History
Access the History View to review previously sent requests and responses.
Typical Workflow
Capture or create a request.
Modify headers, parameters, or payloads.
Send the request.
Analyze the response.
Adjust the request and resend.
Compare responses and identify behavioral differences.
The Request tool is commonly used alongside Intercept, Crawler, and Fuzzer modules to validate findings, replay captured traffic, and perform targeted testing against specific endpoints.